Battery Scheduling
Battery Scheduling

Why should I schedule my battery?
With ZEROHERO, you can charge your battery for free during the day and export power in the evening at a higher feed-in tariff. To get the most from both these features, simply schedule your battery to charge and discharge at the right times.
See the table below for further details on how to make the most of each ZEROHERO feature.
These ZEROHERO plan features work with any battery brand.
| ZEROHERO Plan Feature | Manual Battery Scheduling Required |
|---|---|
| 3hrs free daily grid charging | Schedule to charge from the grid between 11am-2pm |
| Earn $1 per day credit | No manual scheduling required* |
| 15c/kWh feed in tariff | Schedule to discharge to the grid between 6pm-9pm** |
| *Requires usage of less than 0.03kWh per hour between 6-9pm to achieve benefit. **Limited to 10kWh per day. |

How do I schedule my battery?
The app you use to schedule your battery depends on whether you’ve joined our Virtual Power Plant as part of your ZEROHERO plan.
If you join our Virtual Power Plant:
This optional ZEROHERO feature lets us optimise your battery remotely to help boost your earnings, while also giving you the convenience of scheduling your battery directly in your GloBird app.
Note: You may also use your battery manufacturer’s app to schedule your battery when joining our Virtual Power Plant. However, Sigenergy customers must use the GloBird app only.
Compatible Battery Brands
- Alpha
- Anker
- Ecactus
- Neovolt
- Redback
- SAJ
- Sigenergy
- SolaX
- Solis+Dyness
- SunGrow
How to schedule your battery using your GloBird app
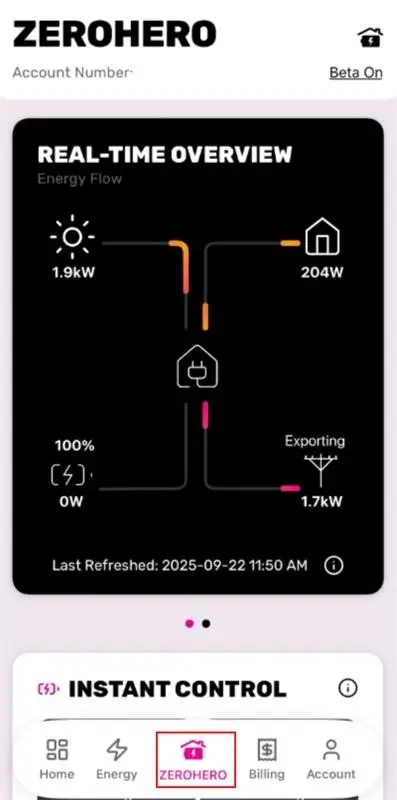
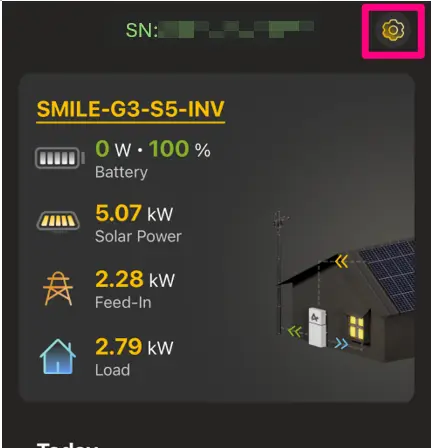
Step 1: Open the GloBird App
After logging in, tap the “ZEROHERO” tab in the navigation bar to access the battery control dashboard.
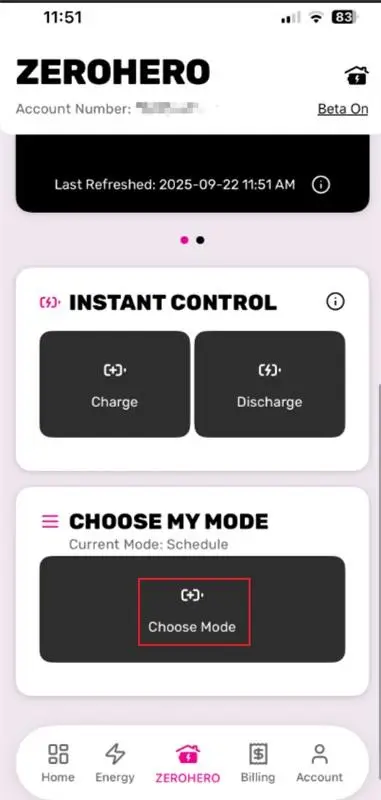
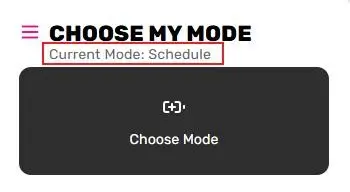
Step 2: Go to Mode Settings
On the ZEROHERO screen, scroll to the bottom, then find and tap “Choose mode”.
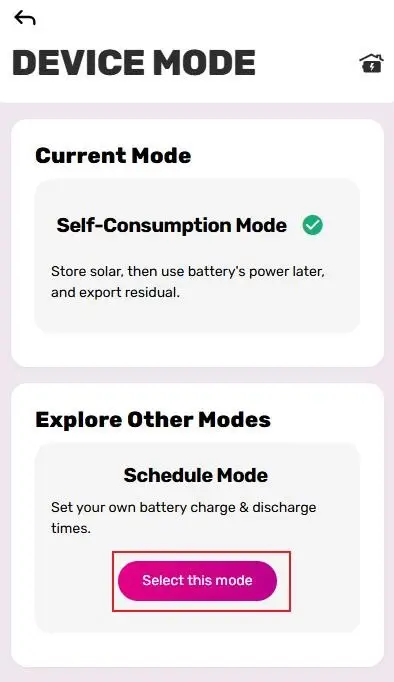
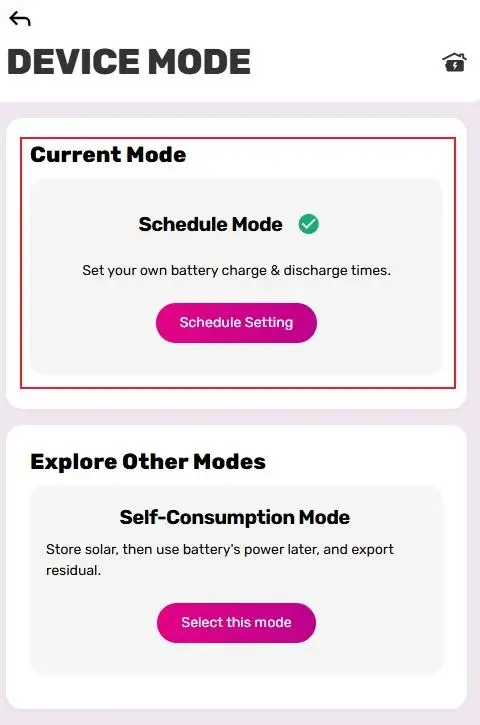
Step 3: Select “Schedule Mode”
On the “Choose my mode” screen, tap “Select this mode” under Schedule Mode..
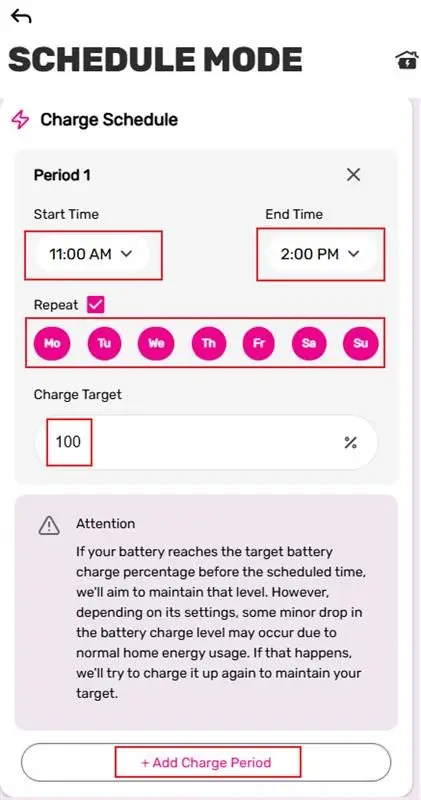
Step 4: Set Charge Schedule
-
Tap “+ Add Charge Period”
-
Set a start and end time (e.g. 11:00 AM to 2:00 PM)
-
Choose the days of the week (e.g. Monday to Sunday)
-
Set the charge target percentage (e.g. charge to 100%)
You can add multiple charge periods by tapping “+Add Charge Period”
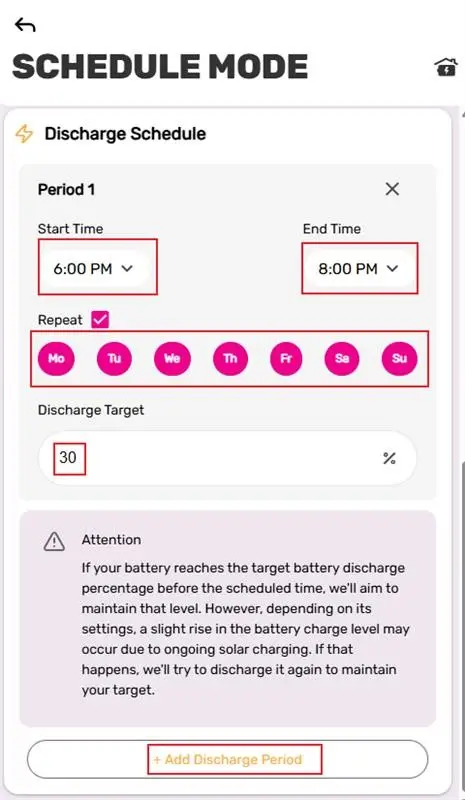
Step 5: Set Discharge Schedule
-
Tap “+ Add Discharge Period”
-
Set time range, repeat days, and discharge target percentage (e.g. discharge to 30%)
-
You can add multiple charge periods by tapping “+Add Discharge Period”
Step 6: Confirm Your Settings
Once everything is set, tap “Confirm and Select” at the bottom of the screen to activate Schedule Mode.
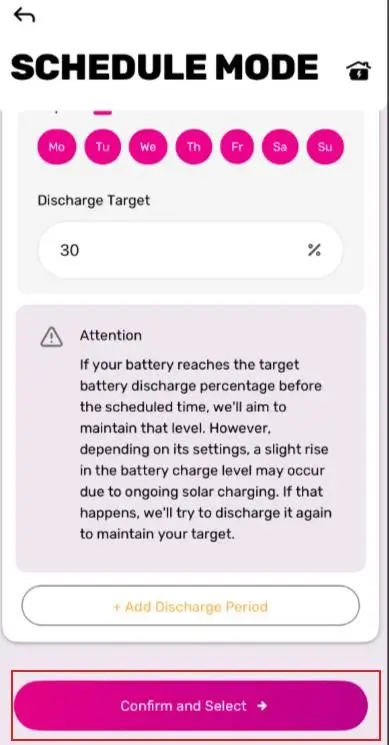
Then you will see the Current mode is switched to Schedule on the ‘Choose My Mode’ Screen and ZEROHERO screen
Notes:
- If there are overlapping time periods, the system will prompt you to adjust them.
- Once Schedule Mode is active, your battery will follow your schedule.
If you’re not in the Virtual Power Plant:
You’ll need to use your battery manufacturer’s app to manage and schedule your battery. If your battery brand is not in the list below, please ask your battery installer for instructions on how to schedule charging and discharging.
How to schedule using your battery manufacturer’s app
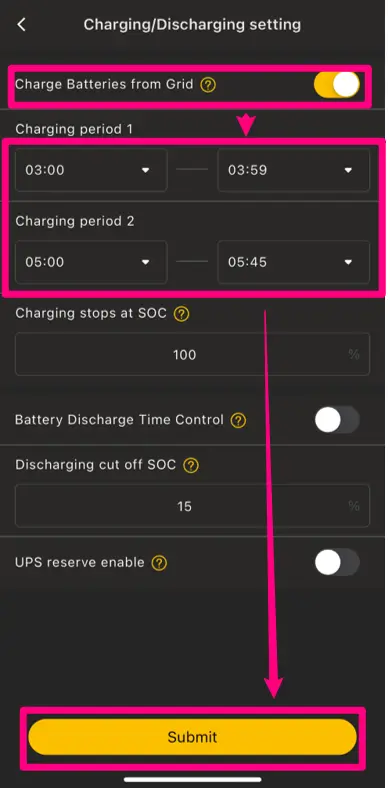
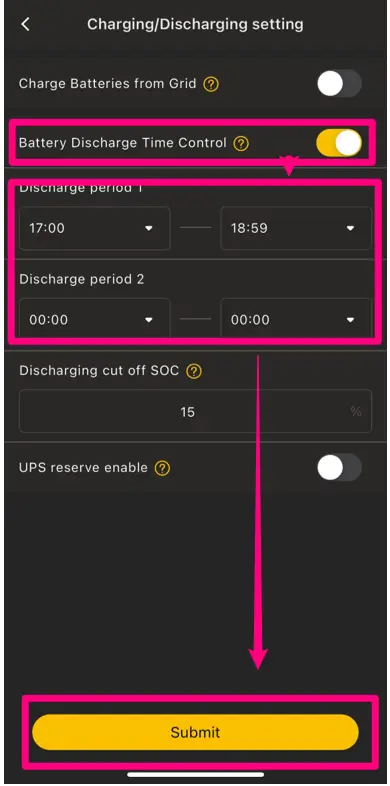
Alpha
-
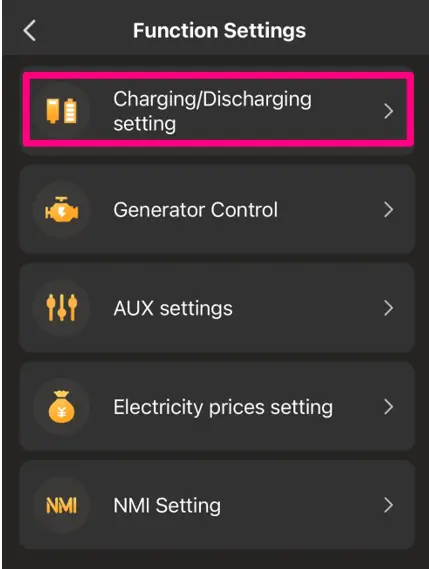
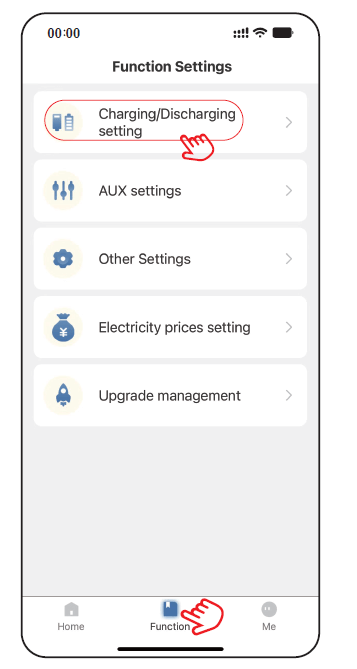
Open your AlphaESS app and click on the button on the upper right corner and navigate to “Setting”.

-
Select” Charging/Discharging setting” within “Function Setting” page.

-
You can schedule two periods for charging/discharging by enabling either "Charge Batteries from Grid (charging)" or "Battery Discharge Time Control (discharging)." After setting the periods, click "Submit" to activate the schedule. Additionally, you can specify when to stop charging or discharging on this page.


Anker
How to schedule your battery in the Anker app
Anker app is currently not available for discharge schedule, for charging scheduling please follow the steps below:
Option 1 - One time force charge (Charge battery at full speed with solar and grid power)
-
Open the Anker app, tap Settings.

-
Tap Modes.

-
Scroll down the page and enable Rapid Battery Charging.

-
Amend your preferred Start Time and Ending Time.


Option 2 - Schedule charge:
By using this function, you can schedule to charge your battery daily by varying time slots.
-
Open the Anker app, tap Settings.
-
Tap Modes.
-
Tick ‘Time of use Mode’ and click ‘Utility Rate Plan’

-
In ‘Time of use’ page, click ‘Weekday & Weekend’ section

-
Add/amend the charging modes/time period by clicking each segment or by scrolling the bar on right hand side to customize your preferred charging period.


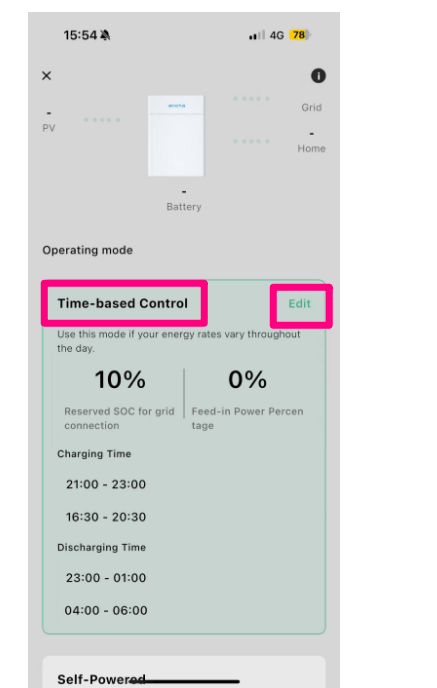
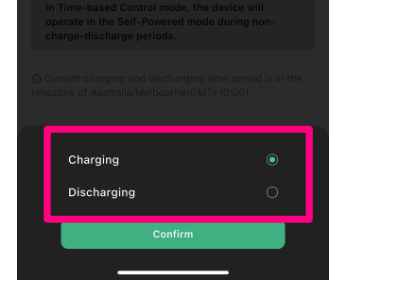
Ecactus
-
Tap ' Device ' on the bottom banner of the Home page, then select your inverter to access the settings


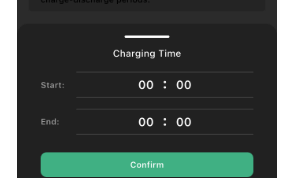
-
Select the ' Time - Based Control ' mode and click ' Edit ' to configure your time settings. Click ' Add Time Period ' to create either a charging or discharging time slot. You can configure the start and end times accordingly, with up to two separate time slots allowed for charging and two for discharging.


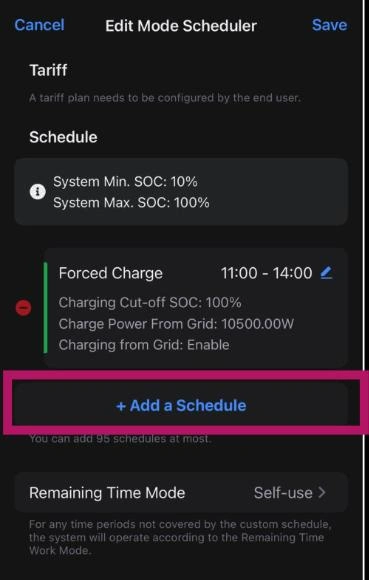
FoxESS
Setting FORCE CHARGE between 11am and 2pm with free power
-
Click on WORK MODE on your home page

-
Click on two blue arrows page

-
Click on Mode Scheduler

-
Click on Add a Schedule

-
Set the time of 11:00 to 14:00 and click the two blue arrows

-
Select FORCE CHARGE

-
Select CONFIRM

-
Select SAVE


Setting FORCE DISCHARGE between 6PM AND 9PM in order to:
If you want the system to handle charging/discharging based on specific goals, you can select a Work Mode in the Quick Settings:
- Avoid pulling any grid power
- Discharging spare power stored in your battery to get the 15c/KWh FiT between 6pm and 8pm
-
Select EDIT in WORK MODE

-
Select ADD A SCHEDULE

-
Set time to 18:00-21:00 and click on two blue arrows

-
Select FORCE DISCHARGE

-
Set Discharging Cut-off to 20% to keep some power in reserve overnight and press CONFIRM

-
Press CONFIRM

-
Check your set-up looks like this and hit SAVE


Neovolt
-
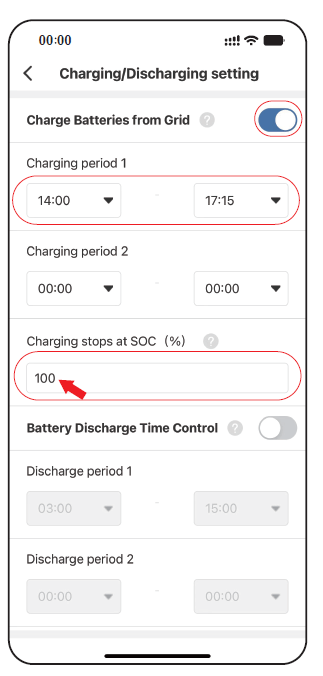
Open your Neovolt app and tap the 'Function' button at the bottom of the home page. Then select 'Charging/Discharging Setting' to begin scheduling.

-
Toggle on the 'Charge Batteries from Globird' or 'Battery Discharge Time Control' switch to enable time period settings. You can set up to two time periods for charging or discharging. Additionally, you can specify when to stop charging or discharging by setting a target State of Charge (SOC%).

Redback
You can schedule your battery through the Redback portal by following these steps:
-
Click the Settings icon in the centre of the homepage.

-
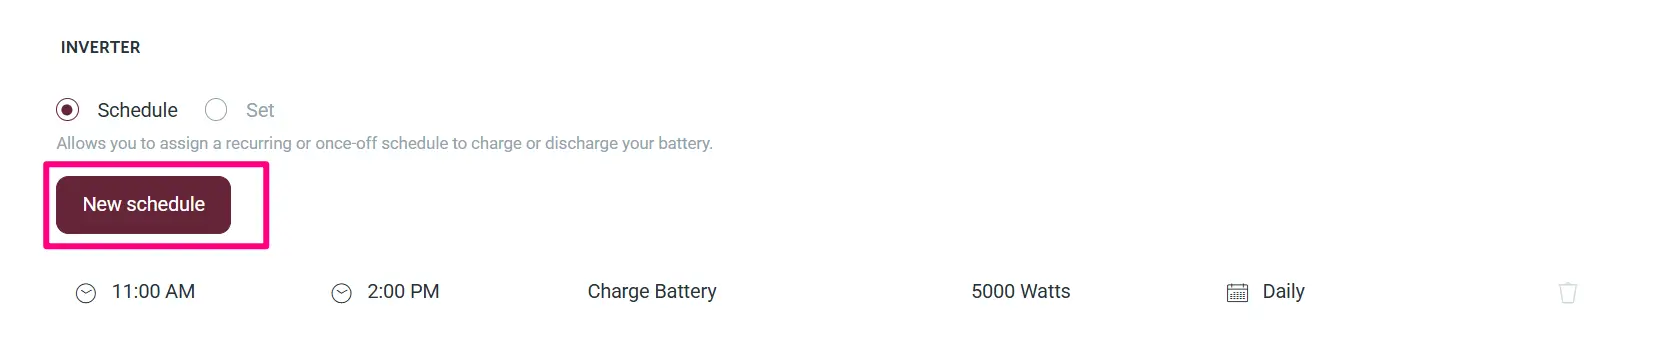
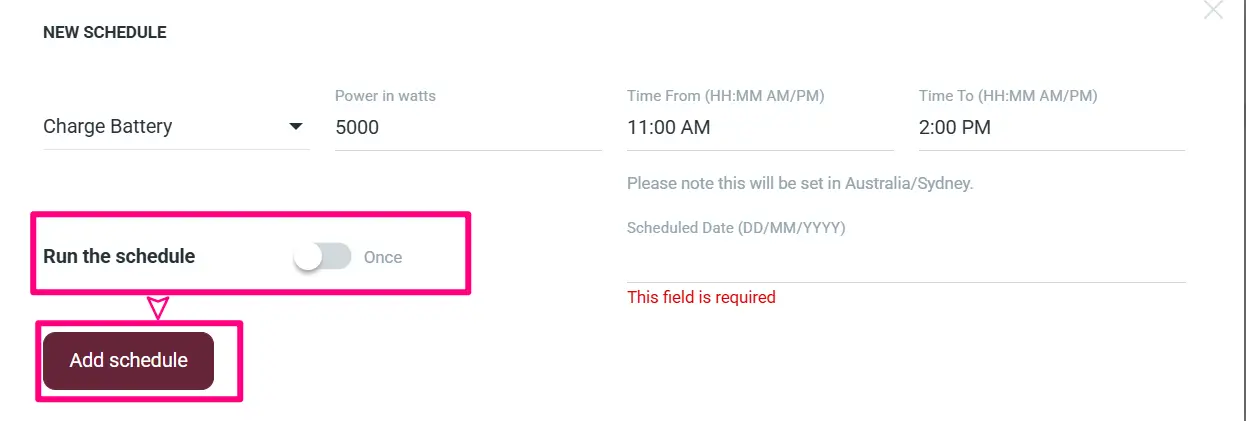
Scroll down to the bottom of the page. Under the inverter section, you will see two options. Select "Schedule" to set your battery to charge or discharge based on time. Click "New Schedule" to begin configuration.

-
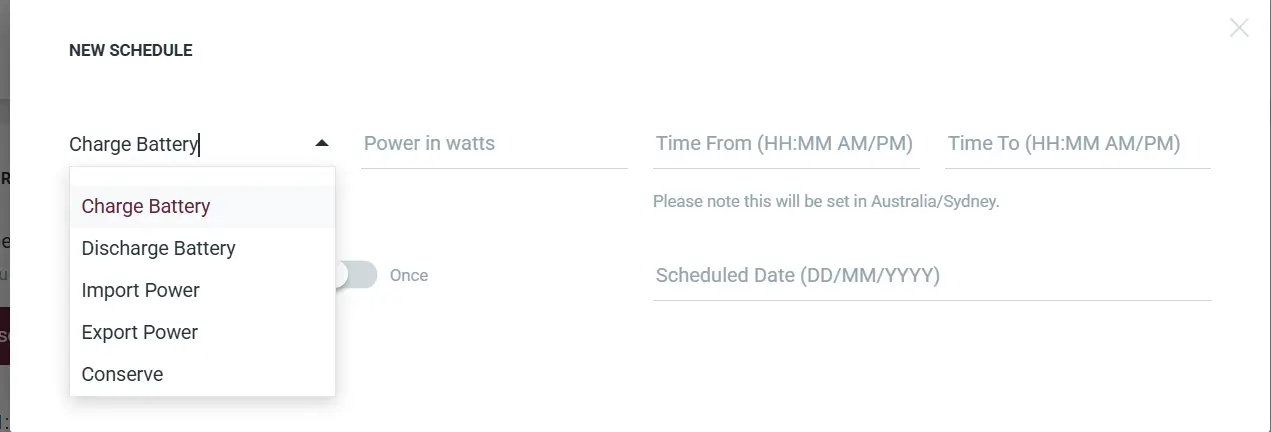
Choose from several scheduling options, including charge, discharge, or conserve mode. You can also set a specific power level (in watts) and define a time period for your schedule.

-
After configuring the time and power settings, select whether the schedule should run once or daily. Click "Add Schedule" to complete the setup.


SAJ
The SAJ app currently doesn’t support scheduling. However, once your battery is successfully connected to us, you can easily control it through the GloBird App. Please refer to the guidance section below for instructions on using the GloBird App.
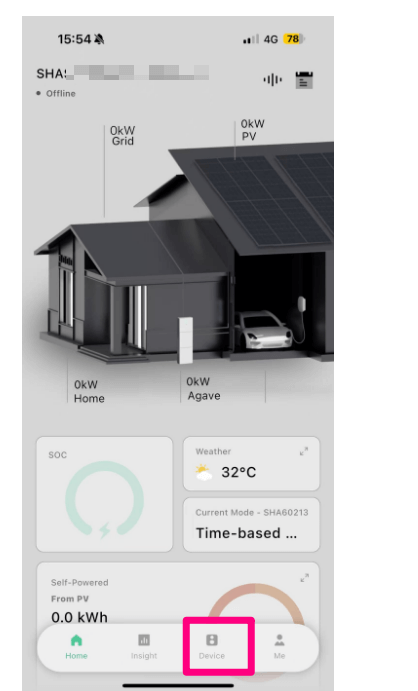
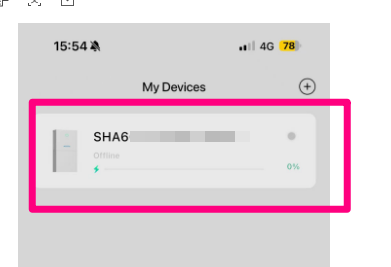
Sigenergy
-
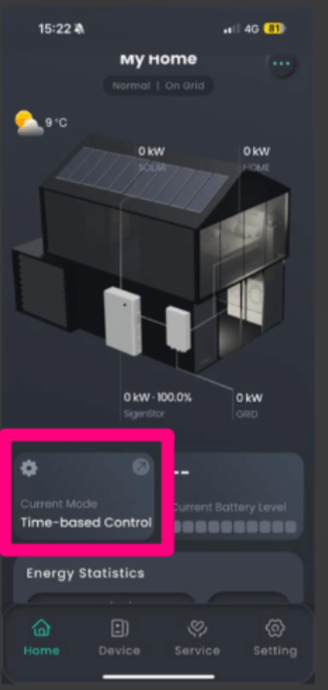
Open the “Mysigen” app and tap the “Current Mode” button on the home page.

-
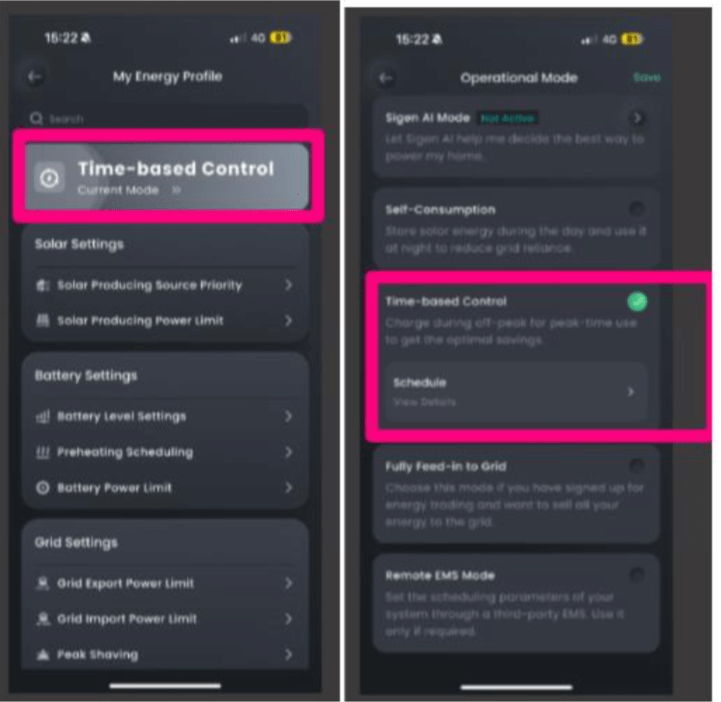
Click on the “current mode”, and you will jump to different operational mode options. Choose “Time-based Control” If you would like to schedule

charge/discharge your battery.
-
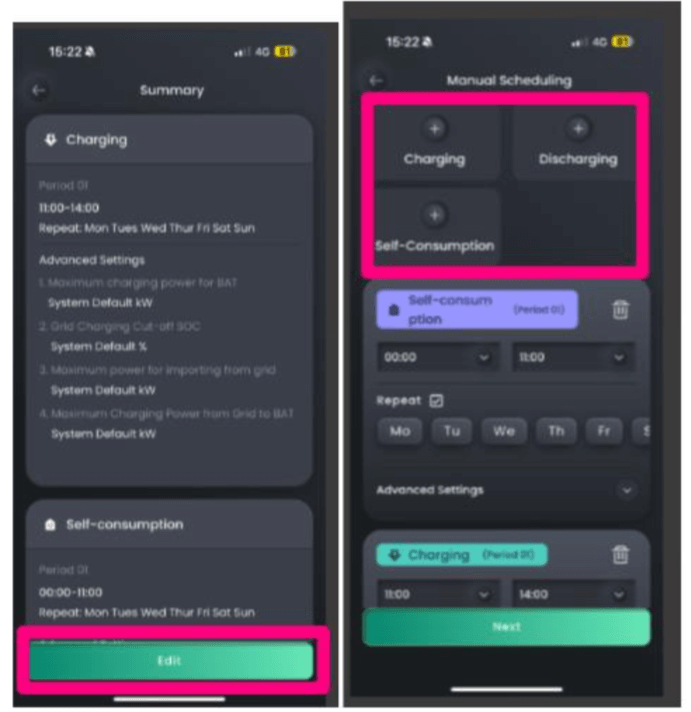
Click on “Schedule” and choose “Edit” to start your own schedule. You will able to choose from charge/discharge/self-consumption. Don’t forget to save your schedule after setting completed.

Sofar
SolaX
-
Open your SolaXcloud app and tap on "Device" in the bottom menu. Then, select the device located on the right side.

-
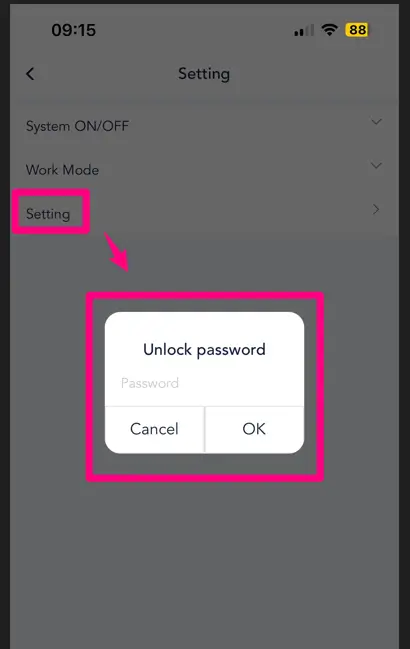
Tap on "Remote Settings" and then select "Settings." You'll need to enter an "Unlock Password" to enable the settings function. If you don't have the password, contact your installer for assistance.


-
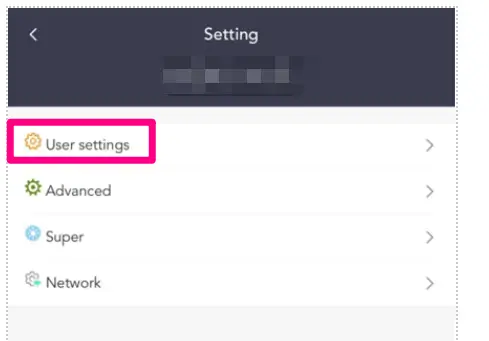
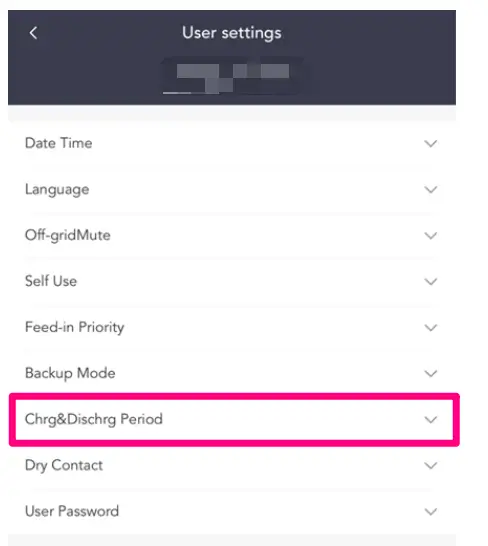
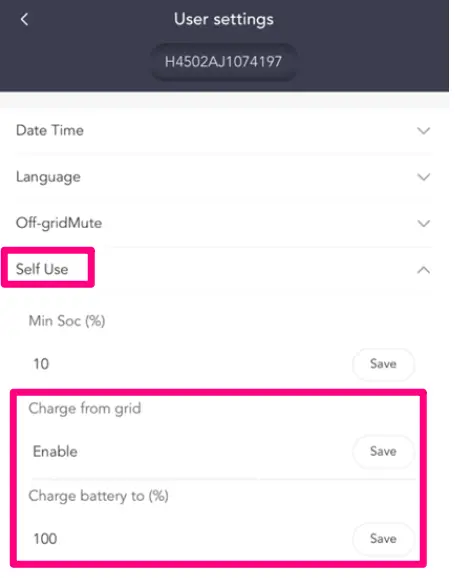
Tap on "User Settings" and expand the "Charge & Discharge Period" to customize your schedule.


-
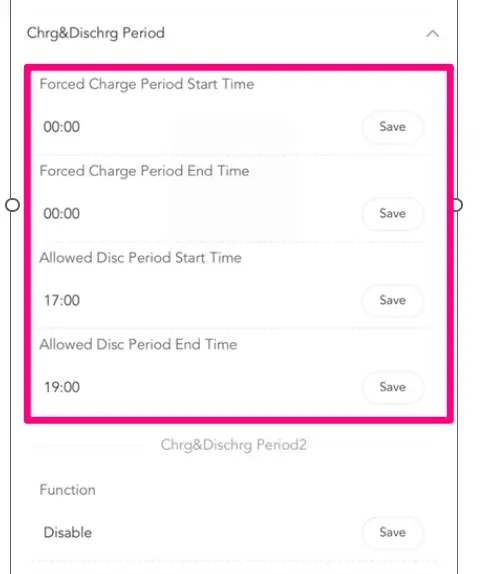
Set your charge and discharge periods by entering the start and end times below. Be sure to tap "Save" to store your settings.

-
Once charge time is settled, please back to “self-use” and make sure to "Enable" the "Charge from Grid" option, set the "Charge Battery to" 100%, and tap "Save".


Solis+Dyness
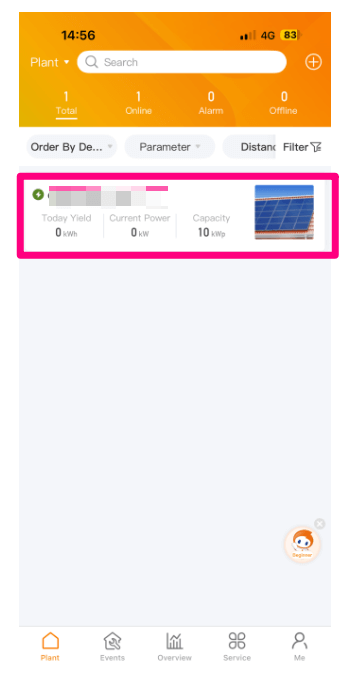
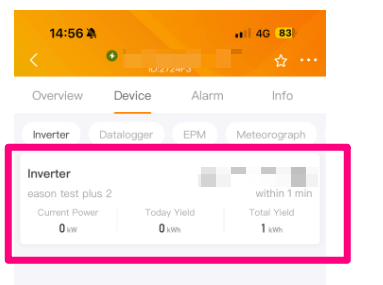
-
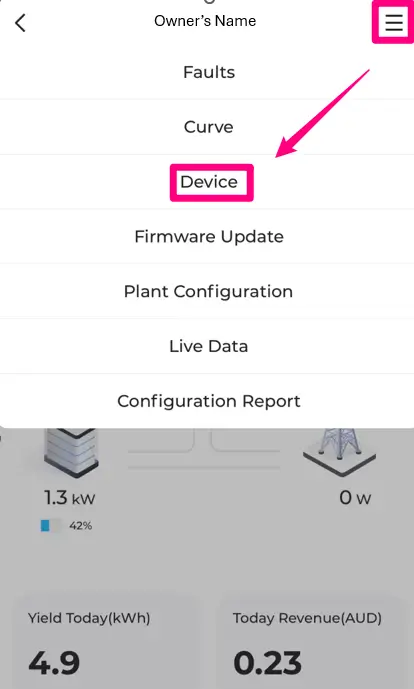
From the Home screen, select your plant and tap ' Device ' on the top banner. Click on inverter into inverter details.


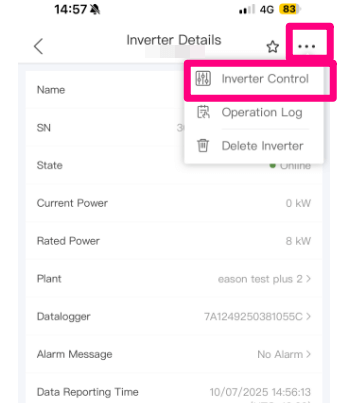
-
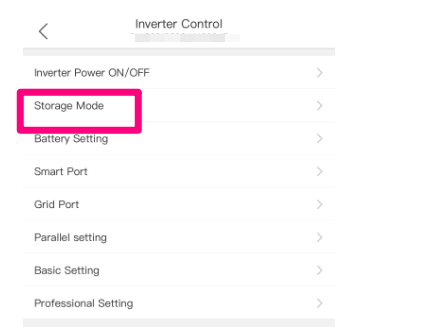
Tap the three dots in the top right corner of the inverter details screen, then select ' Storage Mode '


-
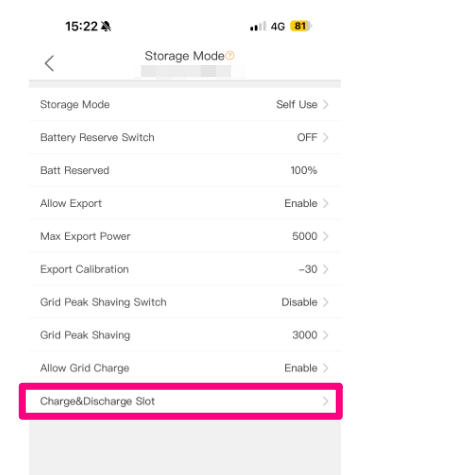
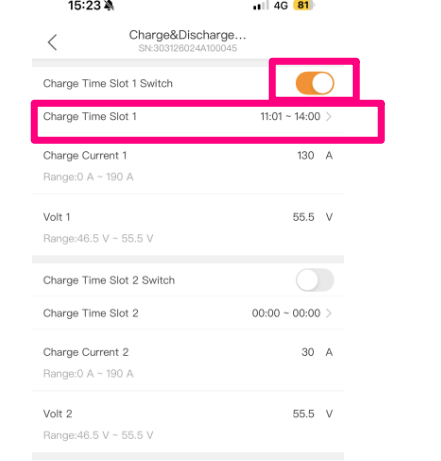
Click on ' Charge & Discharge Slot ' under the Storage Mode page. You can set up to six time slots for charging or discharging by configuring the time and toggling the ' Enable ' button.


Sungrow
-
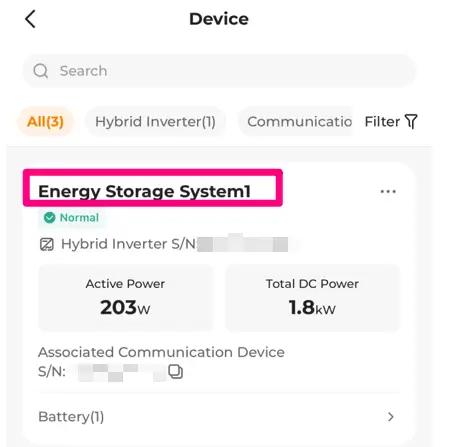
Open your Isolarcloud app and click on the button on the upper right corner and navigate to “Device”.

-
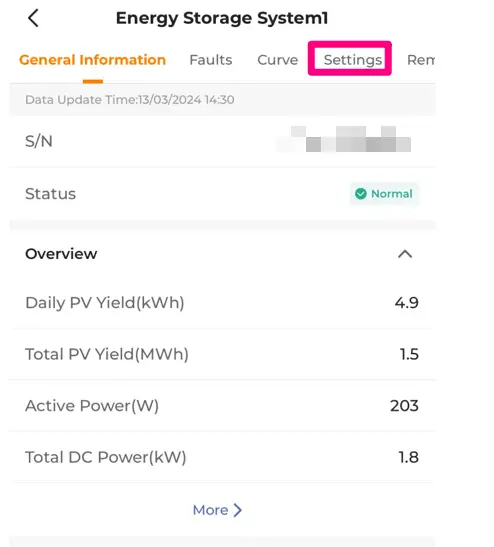
Select "Energy Storage System" and proceed to "Settings" on the following page.


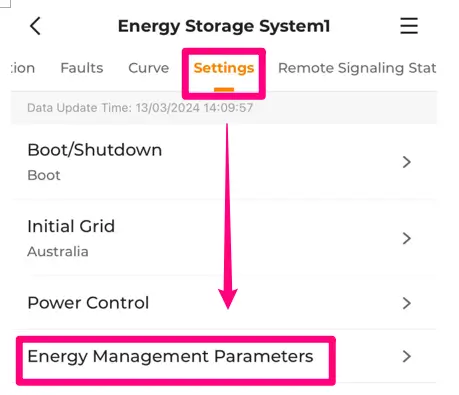
-
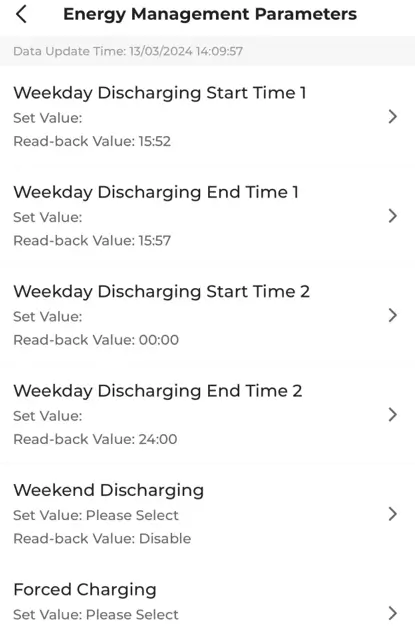
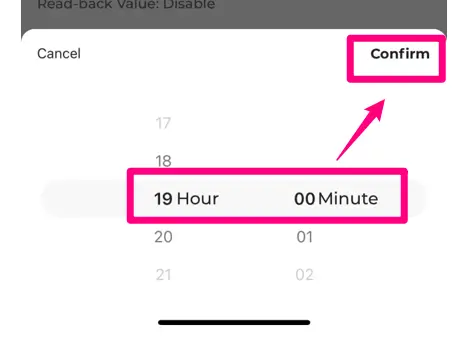
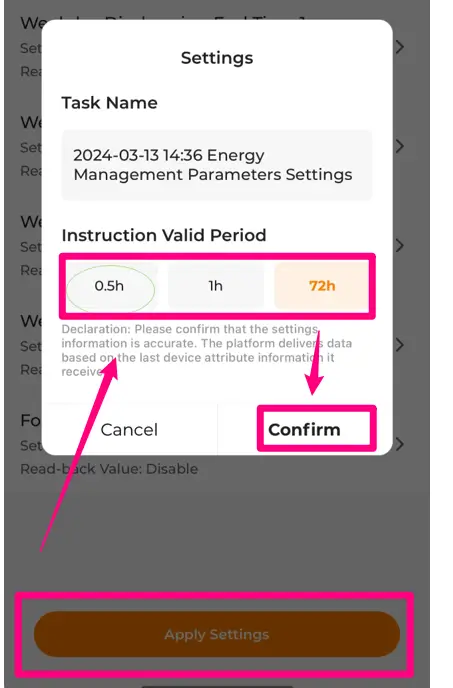
Navigate to "Energy Management Parameters" within the "Settings" page, where you can adjust your charging and discharging periods for both weekdays and weekends by selecting the desired option.


You can start setting your schedule by clicking on the start and end times. For weekdays, you can set up to two schedules for discharging, and you also have the option to enable or disable discharging during weekends or force charging. After updating the time, click on "Apply Setting" to activate your schedule.


Tesla
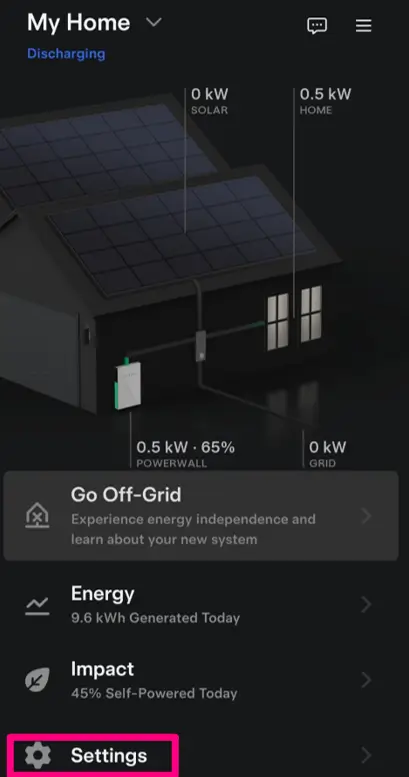
-
Open your Tesla app and click on “Setting” within home page.

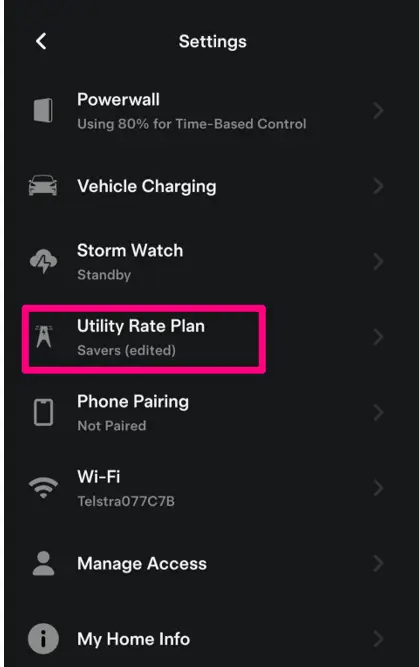
-
Navigate to the "Utility Rate Plan" option on the "Settings" page. Choose "Start Over" to initiate the schedule creation process or select "Edit" if you've already configured your settings previously.


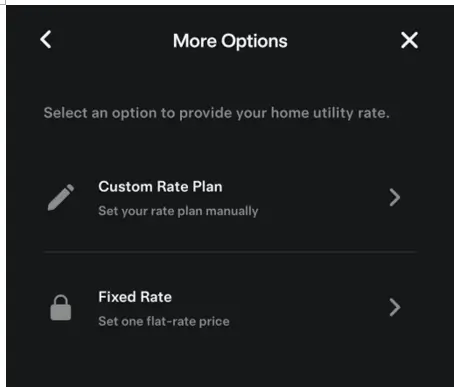
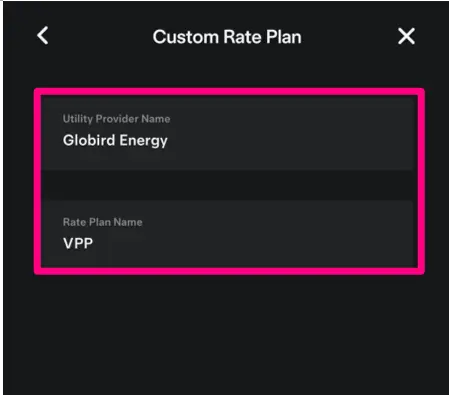
-
You have the option to select either a customer rates plan or fixed rates that best suit your needs. To begin, please fill in the fields for "Utility Provider Name" and "Rate Plan Name."


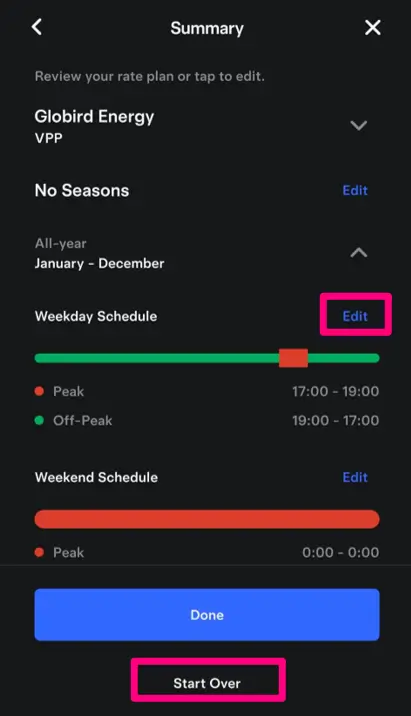
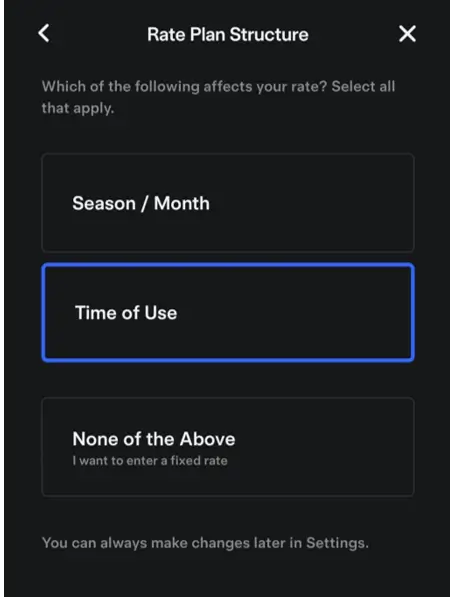
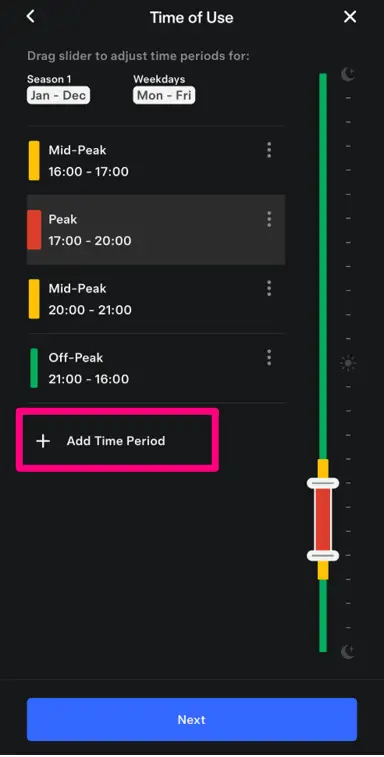
-
Next, you'll be prompted to select the factors influencing your rates and establish your peak/off-peak times according to your weekday and weekend retailer plan. You can easily include additional time periods by selecting "add time period."


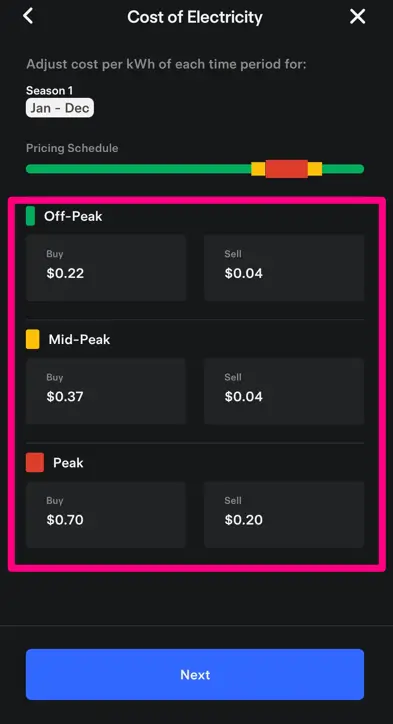
-
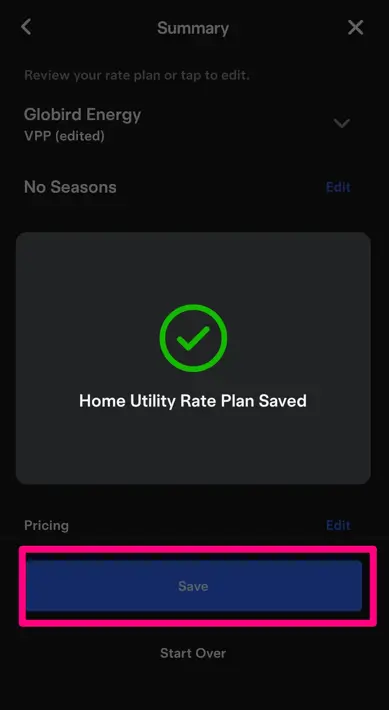
Following that, you'll need to input your electricity costs according to your specific electricity plan. Afterward, by clicking the "next" button, you'll be able to review a summary of your plan. Don't forget to save your plan by clicking the "save" button.


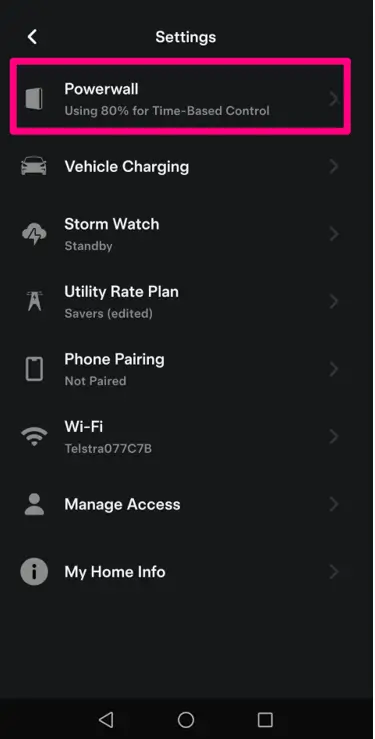
-
To activate your plan, revisit the "Settings" section and select "Powerwall." Then, check the box labelled "Time-Based Control" to activate your plan.